Two Knives, Five Cuts, and the Uniform-Size Rule for Vegetable Prep
Vegetable prep basics without the culinary-school overwhelm: the five cuts a weeknight actually calls for, the two knives that cover them, and why size rules.
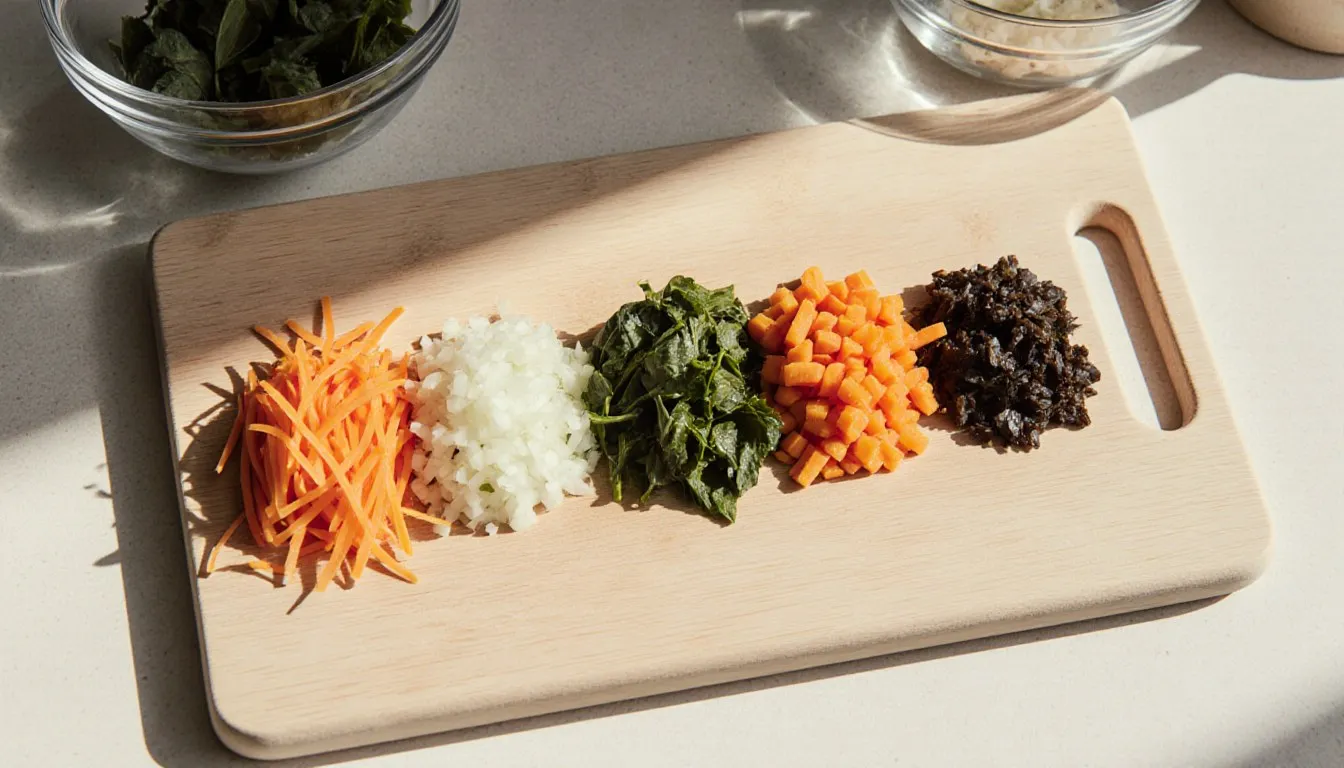
Cut everything going into the same pan to the same size, and most of what goes wrong with home-cooked vegetables stops going wrong. That one habit outranks vocabulary, knife brands, and every video of somebody dicing an onion at 200 pieces a minute. You need two knives, a board that doesn’t slide, and about five cuts. The French terms are useful shorthand once you know them, and completely optional before that.
What follows is the prep half of cooking vegetables: the part that happens before heat is involved, where a weeknight dinner is quietly won or lost.
What counts as prepping a vegetable?
Prepping means everything you do to a vegetable between the grocery bag and the pan: wash, trim, peel if it needs it, cut to size, and sometimes hold it in cold water until you’re ready. Nothing on that list involves heat, which is why prep is its own skill and why getting better at it improves every dish you make, no matter how you plan to cook the thing afterward.
Cooks call the finished state mise en place, which translates to “put in place” and means the humble reality of small bowls lined up with your cut vegetables in them. Fussy as it sounds, those bowls are what let you add the garlic calmly at the right second instead of frantically peeling it while the onions go from golden to grim.
Trimming is the step most people rush. Root ends, the woody bottom inch, the tough outer layer of a leek, the fibrous core of a cabbage, the stem end of a pepper: cut those away first, before you start slicing, so you’re working with clean flat surfaces and not fighting a moving target. Trim, then cut. In that order, every time.
Do you need a full knife set for vegetable prep?
No. A chef’s knife, a paring knife, and a board that stays put will handle nearly everything a home kitchen throws at you, and the twelve-piece block on the counter is mostly furniture. My mother’s line was that a dull knife is the one that cuts you: a sharp blade goes where you aim it, while a dull one skates off a carrot’s curved side and finds your knuckle.
Here’s the working kit:
- An 8-inch chef’s knife. This does ninety percent of the job: chopping, dicing, slicing, mincing, smashing garlic under the flat of the blade. Buy the one that feels balanced in your hand rather than the one with the best story on the box.
- A 3- to 4-inch paring knife. For work in the hand and work too small for the big knife: coring tomatoes, hulling strawberries, trimming green beans, popping the seeds out of a chile.
- A cutting board that doesn’t move. Wood or plastic, big enough that cut pieces have somewhere to go. If it slides, lay a damp paper towel or dish cloth underneath it and the problem disappears.
- Something to sharpen with. A honing steel straightens the edge between sharpenings; an actual sharpener or a once-a-year trip to someone who does it restores it. Both matter.
The mandoline slicer is the optional one. It cuts paper-thin, perfectly even slices faster than any human hand, and it will take a piece of your fingertip without slowing down. If you buy one, use the guard or a cut-resistant glove, no exceptions, and no showing off freehand because the guard is annoying. For most weeknight cooking you’ll reach for it maybe twice a month, usually for gratins, slaws, or potato chips.
What are the basic vegetable cuts, and when do you use each one?
Five shapes cover the vast majority of home cooking, and each one exists because it solves a specific problem. Learn what each shape does to cooking time and mouthfeel, and the names take care of themselves.
- Dice. Cubes, sized to the job: small at about ¼ inch, medium at about ½ inch, large at about ¾ inch. Small dice for a soffritto or the base of a soup, where you want the vegetables to melt into the background. Large dice for a stew or a sheet-pan roast, where you want them to stay themselves. The tiny ⅛-inch version is called a brunoise, and outside of garnish work you will almost never need it.
- Batonnet. Sticks about ¼ inch square and 2 to 2½ inches long. This is the crudité cut, the roasted-carrot cut, the oven-fry cut. It’s also the intermediate step for dicing: cut batonnets first, then cross-cut them into cubes, and your dice comes out even without any measuring.
- Julienne. Thinner sticks, about ⅛ inch square and 2 inches long. Matchsticks. Use it for stir-fries, slaws, and anything raw where you want the vegetable to bend rather than crunch. Julienne cooks fast, so it goes into the pan late.
- Chiffonade. Ribbons of leafy things. Stack the leaves, roll them into a cigar, slice across the roll, and shake the ribbons loose. Basil, mint, sage, and sorrel want this; so do collards and kale headed for a raw salad. Rolling and slicing once means fewer passes with the blade, which keeps basil green instead of black.
- Mince. Chopped as fine as you can get it, shape be damned. Garlic, ginger, shallots, chiles, hard herbs like rosemary and thyme. Minced aromatics burn in seconds, so they go in after the bigger pieces have had a head start.
Rough chop is the sixth one and it’s the one nobody teaches, because there’s nothing to teach. Big, uneven pieces for stock, for a long braise, for anything you’ll blend smooth or strain out. If a vegetable is going to spend two hours in liquid or thirty seconds in a blender, spending five minutes making it pretty is time you’ll never get back.
Why does uniform size matter more than the cut itself?
Heat moves into a piece of vegetable from the outside in, so thickness sets the timer. Put a ¼-inch potato cube and a 1-inch potato cube on the same sheet pan and you get one piece that’s crisped past the point of pleasure and one with a raw center, out of the same oven, at the same moment. That single mismatch causes more disappointing vegetables than any other thing home cooks do.
Uniform here means the pieces in a given pan are close enough to finish together, which in practice is a lot more forgiving than calipers-and-rulers precision would suggest: a pan of carrots that range from a half inch to five-eighths is fine, and one that ranges from a half inch to an inch and a half is not.
Density is the twist. Same-size pieces cook at the same rate only when the vegetables are similar in density, and a potato is nothing like a zucchini. When you’re cooking a mixed pan, cut the dense things smaller and the tender things larger to bring their timelines together: potatoes and carrots in ½-inch pieces, zucchini and peppers in 1-inch pieces, and everything arrives at the same finish line. The alternative is staging them, adding the soft ones partway through, which works just as well and dirties one more bowl.
This is also the answer to the perennial “why do restaurant vegetables taste better” question. A line cook cut that whole hotel pan to one size, because a chef would have sent it back otherwise, and the produce came off the same truck that serves your grocery store.
Should you wash vegetables before or after cutting them?
Before. Federal food-safety guidance is clear on this: wash produce under cool running water before you cut, eat, or cook it, because a knife blade drags whatever is on the outside straight into the flesh where no amount of later rinsing will reach it. That goes for things you peel, too, including melons and winter squash, where the blade crosses the rind on its way in.
The rest of the rules are short. No soap, no detergent, no bleach, no produce-wash sprays; plain running water and friction do the work, and soap residue is its own problem. Scrub firm-skinned things like potatoes, carrots, and squash with a clean vegetable brush. Cut away bruised or damaged spots. And dry everything after washing, which matters for browning later and cuts down on what’s left on the surface. Produce by produce, the guide to fruit and vegetable wash goes through the detail properly.
Two things I get asked constantly. Bagged greens labeled washed or triple-washed don’t need another rinse; running them through your sink is more likely to add something than remove it. And mushrooms don’t want a soak, though the fuller story on cleaning them lives with edible mushrooms, where it belongs.
How do you peel vegetables without wasting half of them?
Sharp peeler, shallow angle, long confident strokes. A dull peeler is the biggest source of waste in most kitchens, because it won’t bite unless you press, and pressing means you’re taking flesh along with the skin. Peelers cost very little and don’t sharpen well, so replace yours when it starts skipping rather than fighting it for another year.
Hold the vegetable at one end and pull the peeler away from you along the length, letting the blade ride the surface instead of digging. A Y-shaped peeler takes broad, thin strips and suits long vegetables like carrots and parsnips; a swivel peeler follows curves better, which makes it the one for round things. On anything bumpy, work in short sections and rotate rather than trying to take one heroic pass.
The bigger savings come from not peeling at all. Scrubbed carrots, potatoes, zucchini, cucumbers that haven’t been waxed, and young eggplant all cook happily with their skins on, and the skin adds texture and color to roasted vegetables. Peel when the skin is genuinely unpleasant to eat or fights the dish: butternut and other hard winter squash, celery root, older thick-skinned eggplant, waxed cucumbers, and anything destined for a silky puree where a fleck of peel would ruin the texture. Root vegetables run their own rules, and the rundown on unusual and root vegetables covers the odd ones.
Save the trimmings if you’re the type. Carrot peels, onion skins, celery tops, leek greens, and herb stems in a bag in the freezer become stock the next time you have a spare hour, and that’s half a bag of garbage you didn’t buy for nothing.
Can you prep vegetables ahead of time and keep them fresh?
Most of them, yes, and Sunday afternoon spent cutting is the single best weeknight upgrade there is. Cut produce needs to go into the refrigerator at 40°F (4°C) or below within two hours of cutting, or one hour on a day when the kitchen hits 90°F (32°C). Store it in a covered container, and get it in the fridge before you sit down.
What holds up well over three to four days:
- Hard roots and stalks. Carrots, celery, parsnips, and turnips cut into batonnets or coins, submerged in cold water in a lidded container. They stay crisp and they don’t dry out at the cut edges. Change the water if it clouds.
- Brassicas. Broccoli and cauliflower florets, cabbage shredded for slaw, Brussels sprouts halved. Store these dry in a covered container, not in water.
- Onions and peppers. Sliced or diced, airtight container, and expect your refrigerator to smell like onion regardless of what the container promised. Onion prep in general is worth doing properly; how to chop an onion covers the technique that makes it fast.
- Winter squash. Peeled and cubed a day or two out is fine, and how to prepare butternut squash gets into the safest way to break one down.
- Washed greens. Sturdy greens washed and spun genuinely dry, then stored with a paper towel in the container, actually keep better than the unwashed bunch you shoved in the crisper, because the towel manages the moisture that rots them.
What doesn’t hold: tender lettuces cut too early wilt and brown at the edges, tomatoes turn mealy and weep, avocado and apple oxidize within the hour, and cut herbs go dark and lose their smell. Tender herbs do better standing upright with their stems in an inch of water, covered loosely, like the world’s least glamorous bouquet. Potatoes brown quickly once cut and want a bowl of cold water; peeling potatoes ahead of time gets into how far ahead you can push it.
One trick worth having: sliced raw onion soaked in cold water for ten to fifteen minutes loses most of its harsh bite while keeping its crunch. Drain it well and it goes on a salad or a sandwich without bulldozing everything else.
What are the most common vegetable prep mistakes?
The same handful, over and over, in every kitchen I’ve ever cooked in, including mine.
- A dull knife. It crushes instead of cutting, which bruises herbs, tears tomato skins, and makes onions sting more because you’re rupturing more cells. It’s also the one that slips. Hone it often, sharpen it twice a year.
- Uneven pieces. Covered above, and worth repeating because it’s the top offender. Look at the pan before it goes in the oven. If your eye catches a piece that’s twice the size of its neighbors, cut it down.
- Skipping the dry-off. Wet vegetables steam instead of browning, and water hitting hot oil spatters. After washing, spin, drain, or blot until the surface is dry to the touch. Roasted vegetables live or die on this step.
- Cutting everything the same size regardless of density. The mirror image of the uniformity rule. A pan of uniform 1-inch cubes with potatoes and zucchini in it is still going to fail.
- Crowding the board. Cut pieces piled around your knife means less room to work and more chance of a slip. Move each vegetable to a bowl as you finish it, which is what the small-bowls habit is really for.
- Prepping in the wrong order. Cut the things that hold first and the things that oxidize last, and use the same board for raw produce as for raw produce only. Anything that touched raw meat gets a different board.
A sharp blade, an eye for size, and the discipline to trim before you slice: that’s the whole kit, and none of it lives in a knife roll. Once the shapes above stop taking thought, the rest of how to cook vegetables gets shorter, because half of that job was standing at the board.
Start this week by cutting a quart more than you need. A container of carrot and celery batonnets under cold water in the fridge turns into soup base on Tuesday, a snack on Wednesday, and a stir-fry on Thursday, all off one session at the board with the radio on.
Tessa Calloway
Staff Writer
Tessa Calloway has spent twenty years cooking dinner on a weeknight clock and testing the shortcuts that survive contact with a real kitchen. She believes the best recipe is the one you can make with what's already in the house, and she has strong opinions about what actually needs to be homemade (less than you think) and what always does (dressing).